Category
INDEX


シェーダー基礎、URP環境でuGUI用マルチパスシェーダー
[Unityシェーダー基礎] URP環境でuGUI用マルチパスシェーダーの作り方。
CanvasRendererの描画をハックする方法。
#UnityShader

投稿日:2026-04-10

更新日:2026-05-02
関連ページ
URP環境においては、uGUIの描画ルールがより厳しくなり、Passを複数書いても一番最初のPassしか実行してくれなくなりました。
しかし複雑なシェーダーを作りたい場合、どうしても
2日くらいAIと問答を繰り返したところ、ようやく実用的なコードを吐き出してくれたので共有します。
 マルチパスを実装することで例えば以下のような複雑な処理を1フレーム内で順に実行させることが可能です。
(一般にBloom、あるいは Glowシェーダー と言われる処理です)

uGUIにおいて、昔のビルトインRP環境であれば、ただPassを複数書くだけで上から順に実行してくれました。
ではuGUIではマルチパスシェーダーは作れないかというとそんな事はありません。
少しトリッキーですが、C#から明示的にPassを指定しつつ、CanvasRendererの挙動をハックするとマルチパスの実装が可能です。
今回テストとして比較的シンプルな2Passシェーダーを作りました。
内容はC#のインスペクターから
本来はこの程度の実装であれば2Passではなく1Passでも実装できますし、描画効率も良いです。
マルチパスの説明のために、敢えてこれを2Passで実装してみます。
内容としてはPass0でx軸の画像の切り抜きを行い、Pass1でy軸の画像の切り抜きを実行します。
UnityPackageとしてこちら
にまとめておきました。
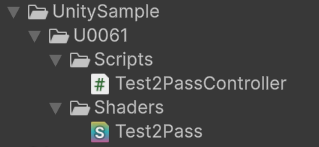
展開するとAssets/UnitySample/U0061の下に次のようなファイル群が追加されるはずです。
このうちの
uGUIではマルチパスを実装するには、核となるシェーダー側の実装と、シェーダーの挙動を管理するC#側の実装の2つが必要になります。
以下シェーダー側のコード全文です。

後ろの方にPassが2つ実装されています。
Pass
{
Blend SrcAlpha OneMinusSrcAlpha
HLSLPROGRAM
half4 frag (Varyings input) : SV_Target
Pass
{
Blend One Zero
HLSLPROGRAM
half4 frag (Varyings input) : SV_Target
このコードで特徴的なのは、コメントにも書いてある通り、Passが上から順に実行される訳ではないことです。
uGUIの描画はCanvasRendererで厳しめに管理されていて、C#側から描画順の全てを管理することが困難です。
普通に実装すると、最終的にはCanvasRendererがC#側の実装を全て塗り替えてしまいます。
このため、
half4 original = SAMPLE_TEXTURE2D(_CustomTex, sampler_CustomTex, input.uv);
uGUIが標準で使う
次にC#側の実装になります。以下コード全文です。
以下のコードで、シェーダー内の2つ目のPassを明示的に呼び出し、その結果を
Graphics.Blit(sourceTexture, tmpRenderTexture, createdMaterial, 1);
1つ目のPass(シェーダー内の一番上のPass)の呼び出しは、CanvasRendererに任せます。
このため描画順はPass1 > Pass0という、通常のシェーダーの流れとは違うトリッキーなものになります。
Pass1の結果が代入されたtmpRenderTextureと、シェーダー内の_CustomTexとの紐づけは、
targetImage.material.SetTexture("_CustomTex", tmpRenderTexture);
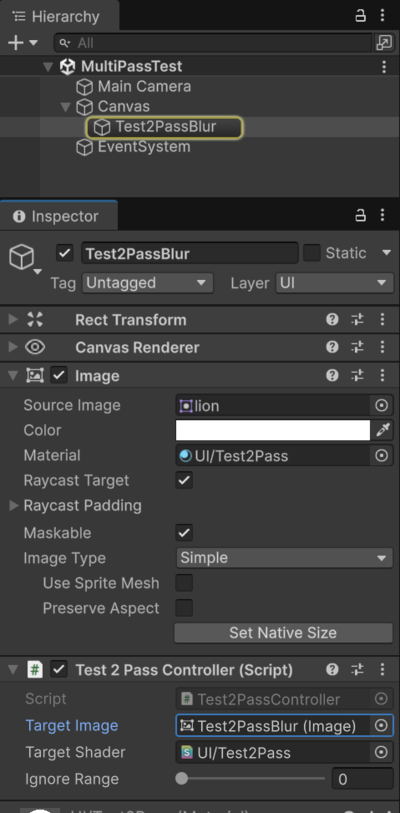
後はHierarchyから、シェーダーを適用させたいImageと、作成したシェーダーをアタッチさせれば実装完了です。
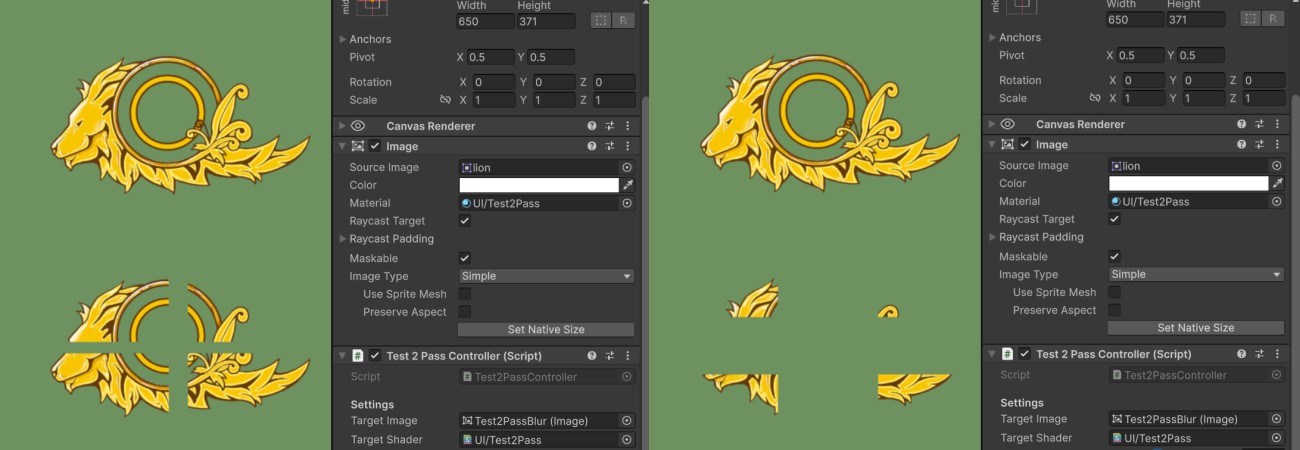
インスペクターのIgnoraRangeの値を上げると、十字の切り抜きが拡大していきます。
では_CustomTexを使わず、Pass0で標準の_MainTexを使った、どういう挙動になるでしょうか。
コードを次のように修正してみます。
half4 original = SAMPLE_TEXTURE2D(_MainTex, sampler_MainTex, input.uv);
結果は以下の通りで、Pass1の結果をPass0に引き継げずに、x軸の処理だけ行われます。
どうしてこうなるかと言うと、CanvasRendererの描画段階に入ると、まず _MainTexの参照先が強制的に上書きされるからです。
uGUI Image > Source Imageにアタッチされた画像の情報を_MainTexに代入し直してから、シェーダーの一番上のPassが実行されます。
Blitによって一時的にPass1の結果を指していたとしても、Pass0が走る瞬間には元の画像に戻ってしまい、処理内容が引き継がれません。
URP環境においては、uGUIの描画ルールがより厳しくなり、Passを複数書いても一番最初のPassしか実行してくれなくなりました。

しかし複雑なシェーダーを作りたい場合、どうしても
マルチパス
を作りたいことがあります。マルチパスについて
(一般にBloom、あるいは Glowシェーダー と言われる処理です)
・
1Pass目でx軸をぼかす ・
1Pass目の結果を引き継いで、その上から2Pass目でy軸をぼかす(Separable Blur) ・
2Pass目の結果を引き継いで、その上から3Pass目でオリジナルの画像を被せて、その後全体を光らせるしかしURP環境下では
CanvasRenderer
によってプロセスが厳密に管理され、実行されるのは基本一番上のPassのみです。少しトリッキーですが、C#から明示的にPassを指定しつつ、CanvasRendererの挙動をハックするとマルチパスの実装が可能です。
十字切り抜き2Passシェーダー
内容はC#のインスペクターから
IgnoreRange
を操作すると、指定した画像が十字型に切り抜かれていくという実装です。マルチパスの説明のために、敢えてこれを2Passで実装してみます。
内容としてはPass0でx軸の画像の切り抜きを行い、Pass1でy軸の画像の切り抜きを実行します。
展開するとAssets/UnitySample/U0061の下に次のようなファイル群が追加されるはずです。
このうちの
Test2PassController
を、ImageコンポーネントがアタッチされているGameObjectにアタッチしてください。シェーダー側の解説
以下シェーダー側のコード全文です。
Shader "UI/Test2Pass"
{
Properties
{
[HideInInspector] _MainTex("-", 2D) = "white"{}
[HideInInspector] _CustomTex("-", 2D)="white"{}
[HideInInspector] _IgnoreRange("-", float) = 0
}
SubShader
{
Tags
{
"RenderPipeline" = "UniversalPipeline"
"Queue" = "Transparent"
}
Cull Off
ZWrite Off
HLSLINCLUDE
#pragma vertex vert
#pragma fragment frag
#include "Packages/com.unity.render-pipelines.universal/ShaderLibrary/Core.hlsl"
TEXTURE2D(_MainTex);
SAMPLER(sampler_MainTex);
TEXTURE2D(_CustomTex);
SAMPLER(sampler_CustomTex);
CBUFFER_START(UnityPerMaterial)
half _IgnoreRange;
CBUFFER_END
struct Attributes
{
half2 uv : TEXCOORD0;
float4 positionOS : POSITION;
};
struct Varyings
{
half2 uv : TEXCOORD0;
float4 positionCS : SV_POSITION;
};
Varyings vert (Attributes input)
{
Varyings output;
output.positionCS = TransformObjectToHClip(input.positionOS.xyz);
output.uv = input.uv;
return output;
}
ENDHLSL
Pass
{
Blend SrcAlpha OneMinusSrcAlpha
HLSLPROGRAM
half4 frag (Varyings input) : SV_Target
{
half4 original = SAMPLE_TEXTURE2D(_CustomTex, sampler_CustomTex, input.uv);
half isRightInUV = step(0.5 + _IgnoreRange, input.uv.x);
half isLeftInUV = step(input.uv.x, 0.5 - _IgnoreRange);
half isCenter = 1 - max(isRightInUV, isLeftInUV);
return lerp(original, half4(0, 0, 0, 0), isCenter);
}
ENDHLSL
}
Pass
{
Blend One Zero
HLSLPROGRAM
half4 frag (Varyings input) : SV_Target
{
half4 original = SAMPLE_TEXTURE2D(_MainTex, sampler_MainTex, input.uv);
half isUpInUV = step(0.5 + _IgnoreRange, input.uv.y);
half isDownInUV = step(input.uv.y, 0.5 - _IgnoreRange);
half isCenter = 1 - max(isUpInUV, isDownInUV);
return lerp(original, half4(0, 0, 0, 0), isCenter);
}
ENDHLSL
}
}
}
{
//以下は全部インスペクター上には表示しないけど必要な処理
//ここで宣言しておかないとSceneセーブした時などに値が維持されない
Properties
{
[HideInInspector] _MainTex("-", 2D) = "white"{}
//uGUI及びGraphics.Blitが標準で扱うテクスチャ
[HideInInspector] _CustomTex("-", 2D)="white"{}
[HideInInspector] _IgnoreRange("-", float) = 0
}
SubShader
{
Tags
{
"RenderPipeline" = "UniversalPipeline"
"Queue" = "Transparent"
}
Cull Off
ZWrite Off
HLSLINCLUDE
#pragma vertex vert
#pragma fragment frag
#include "Packages/com.unity.render-pipelines.universal/ShaderLibrary/Core.hlsl"
//uGUI Image > Source Imageにアタッチされた画像を参照できるようにする
TEXTURE2D(_MainTex);
SAMPLER(sampler_MainTex);
//最終的に画面に出力されるテクスチャを宣言、中身のデータはC#側から渡される
TEXTURE2D(_CustomTex);
SAMPLER(sampler_CustomTex);
//SRP Batcherを適用、動的に変更される数値はこの中に定義
CBUFFER_START(UnityPerMaterial)
half _IgnoreRange;
CBUFFER_END
struct Attributes
{
half2 uv : TEXCOORD0;
float4 positionOS : POSITION;
};
struct Varyings
{
half2 uv : TEXCOORD0;
float4 positionCS : SV_POSITION;
};
Varyings vert (Attributes input)
{
Varyings output;
output.positionCS = TransformObjectToHClip(input.positionOS.xyz);
output.uv = input.uv;
return output;
}
ENDHLSL
//Pass0: 一番上のPassはuGUIのCanvasRendererから自動的に呼び出される、処理的には下のPass1より後に実行される
Pass
{
//最終出力は背景と合成させる
Blend SrcAlpha OneMinusSrcAlpha
HLSLPROGRAM
//画像x軸の真ん中あたりの描画を飛ばす
half4 frag (Varyings input) : SV_Target
{
//_MainTexではなく、C#側から書き込みを行った_CustomTexを最終的な描画対象とする
//これによりuGUIの標準の描画ロジックを回避して、Pass1の内容を引き継いで出力できる
//まずこの_CustomTexから、指定のUV座標のピクセル色を抜き出す
half4 original = SAMPLE_TEXTURE2D(_CustomTex, sampler_CustomTex, input.uv);
half isRightInUV = step(0.5 + _IgnoreRange, input.uv.x);
//渡されたUV座標が画像の右側に存在するか
half isLeftInUV = step(input.uv.x, 0.5 - _IgnoreRange);
//渡されたUV座標が画像の左側に存在するか
half isCenter = 1 - max(isRightInUV, isLeftInUV);
//渡されたUV座標がx軸の真ん中あたりかどうか
return lerp(original, half4(0, 0, 0, 0), isCenter);
//真ん中辺りだったら透明色を渡して描画させない
}
ENDHLSL
}
//Pass1: C#から明示的に呼び出す
Pass
{
//この段階では背景との合成が必要ないのでBlend Off
Blend One Zero
HLSLPROGRAM
//画像y軸の真ん中あたりの描画を飛ばす
half4 frag (Varyings input) : SV_Target
{
//SourceImageにアタッチされた画像の、指定UV座標のピクセル色を取得
half4 original = SAMPLE_TEXTURE2D(_MainTex, sampler_MainTex, input.uv);
half isUpInUV = step(0.5 + _IgnoreRange, input.uv.y);
//渡されたUV座標が画像の上側に存在するか
half isDownInUV = step(input.uv.y, 0.5 - _IgnoreRange);
//渡されたUV座標が画像の下側に存在するか
half isCenter = 1 - max(isUpInUV, isDownInUV);
//渡されたUV座標がy軸の真ん中あたりかどうか
return lerp(original, half4(0, 0, 0, 0), isCenter);
//真ん中辺りだったら透明色を渡して描画させない
}
ENDHLSL
}
}
}
Passの実行順
//Pass0: 一番上のPassはuGUIのCanvasRendererから自動的に呼び出される、処理的には下のPass1より後に実行される
Pass
{
//最終出力は背景と合成させる
Blend SrcAlpha OneMinusSrcAlpha
HLSLPROGRAM
//画像x軸の真ん中あたりの描画を飛ばす
half4 frag (Varyings input) : SV_Target
//Pass1: C#から明示的に呼び出す
Pass
{
//この段階では背景との合成が必要ないのでBlend Off
Blend One Zero
HLSLPROGRAM
//画像y軸の真ん中あたりの描画を飛ばす
half4 frag (Varyings input) : SV_Target
uGUIの描画はCanvasRendererで厳しめに管理されていて、C#側から描画順の全てを管理することが困難です。
普通に実装すると、最終的にはCanvasRendererがC#側の実装を全て塗り替えてしまいます。
CanvasRendererの「カメラ描画工程の後ろの方で、一番上のPassを暗黙的に呼ぶ」という仕様
をそのまま利用し、かつハックします。//_MainTexではなく、C#側から書き込みを行った_CustomTexを最終的な描画対象とする
//これによりuGUIの標準の描画ロジックを回避して、Pass1の内容を引き継いで出力できる
//まずこの_CustomTexから、指定のUV座標のピクセル色を抜き出す
half4 original = SAMPLE_TEXTURE2D(_CustomTex, sampler_CustomTex, input.uv);
_MainTex
ではなく、C#から流し込んだ _CustomTex
を、CanvasRendererに描画させます。C#側の解説
using UnityEngine;
using UnityEngine.UI;
[ExecuteAlways]
using UnityEngine;
using UnityEngine.UI;
[ExecuteAlways]
public class Test2PassController : MonoBehaviour
{
[SerializeField] private Image targetImage;
[SerializeField] private Shader targetShader;
[SerializeField, Range(0f, 0.5f)] private float ignoreRange;
private Texture2D sourceTexture;
private Material createdMaterial;
private RenderTexture tmpRenderTexture;
private float _lastIgnoreRange;
private bool NeedsInitialization => sourceTexture == null || sourceTexture != targetImage.sprite.texture ||
createdMaterial == null || targetImage.material != createdMaterial ||
tmpRenderTexture == null;
private bool CahngedParameter => !Mathf.Approximately(ignoreRange, _lastIgnoreRange);
private void Reset()
{
if(targetImage == null)
{
targetImage = GetComponent<Image>();
}
}
private void Init()
{
Release();
sourceTexture = targetImage.sprite.texture;
createdMaterial = new (targetShader);
createdMaterial.hideFlags = HideFlags.DontSave;
targetImage.material = createdMaterial;
tmpRenderTexture = new RenderTexture(sourceTexture.width, sourceTexture.height, 0);
targetImage.material.SetTexture("_CustomTex", tmpRenderTexture);
UpdateTexture();
}
private void Start()
{
if (NeedsInitialization)
{
Init();
}
}
private void Update()
{
if (targetImage == null || targetImage.sprite == null || targetShader == null)
{
return;
}
if (NeedsInitialization)
{
Init();
}
else if(CahngedParameter)
{
UpdateTexture();
}
}
private void UpdateTexture()
{
_lastIgnoreRange = ignoreRange;
createdMaterial.SetFloat("_IgnoreRange", ignoreRange);
Graphics.Blit(sourceTexture, tmpRenderTexture, createdMaterial, 1);
}
private void Release()
{
if (tmpRenderTexture != null)
{
tmpRenderTexture.Release();
}
if (createdMaterial != null)
{
DestroyImmediate(createdMaterial);
}
}
private void OnDisable()
{
Release();
}
}
using UnityEngine.UI;
[ExecuteAlways]
/// <summary>
/// uGUIの2Passを実装するために、RenderTextureを自前で流し込むクラス
/// </summary>
using UnityEngine;
using UnityEngine.UI;
[ExecuteAlways]
/// <summary>
/// uGUIの2Passを実装するために、RenderTextureを自前で流し込むクラス
/// </summary>
public class Test2PassController : MonoBehaviour
{
[SerializeField] private Image targetImage;
[SerializeField] private Shader targetShader;
[SerializeField, Range(0f, 0.5f)] private float ignoreRange;
//画像描画の無視範囲を設定する
private Texture2D sourceTexture;
private Material createdMaterial;
private RenderTexture tmpRenderTexture;
//変更があったときだけ更新するためのキャッシュ
private float _lastIgnoreRange;
/// <summary>
/// 初期化処理の必要性がある場合trueを返す
/// </summary>
private bool NeedsInitialization => sourceTexture == null || sourceTexture != targetImage.sprite.texture ||
createdMaterial == null || targetImage.material != createdMaterial ||
tmpRenderTexture == null;
/// <summary>
/// ignoreRangeのパラメータに変化があったかチェック
/// </summary>
private bool CahngedParameter => !Mathf.Approximately(ignoreRange, _lastIgnoreRange);
/// <summary>
/// コンポーネントをアタッチした時一度だけ呼ばれる
/// </summary>
private void Reset()
{
if(targetImage == null)
{
targetImage = GetComponent<Image>();
}
}
/// <summary>
/// 初期化処理
/// </summary>
private void Init()
{
Release();
sourceTexture = targetImage.sprite.texture;
createdMaterial = new (targetShader);
createdMaterial.hideFlags = HideFlags.DontSave;
targetImage.material = createdMaterial;
//Imageとアタッチされた画像と同じサイズでRenderTextureを作成
tmpRenderTexture = new RenderTexture(sourceTexture.width, sourceTexture.height, 0);
//事前にBlitで更新される予定のtmpRenderTextureを、_CustomTexの名前でシェーダー側と紐づけておく
//後はCanvasRender内の処理で自動的にPass0を実行させて、その_CustomTexを画像に反映させる
targetImage.material.SetTexture("_CustomTex", tmpRenderTexture);
//初期化後は問答無用でUpdateTextureを呼ぶ
UpdateTexture();
}
/// <summary>
/// 最初にUnityが1回だけ呼ぶ処理
/// </summary>
private void Start()
{
if (NeedsInitialization)
{
Init();
}
}
/// <summary>
/// Unityから毎フレーム呼ばれる処理
/// </summary>
private void Update()
{
if (targetImage == null || targetImage.sprite == null || targetShader == null)
{
return;
}
if (NeedsInitialization)
{
Init();
}
else if(CahngedParameter)
{
UpdateTexture();
}
}
/// <summary>
/// 対象のシェーダーの2Passを実行させる
/// </summary>
private void UpdateTexture()
{
_lastIgnoreRange = ignoreRange;
//非表示領域をセット
createdMaterial.SetFloat("_IgnoreRange", ignoreRange);
//第1引数の画像を元に、Blitでシェーダー内のPass1を実行させ、結果を第2引数に書き込む
//Blitの仕様上、この書き込み処理は、第3引数のMaterial内の_MainTexを通して行われる
Graphics.Blit(sourceTexture, tmpRenderTexture, createdMaterial, 1);
}
/// <summary>
/// 作成したRenderTextureやMaterialのメモリを解放する
/// </summary>
private void Release()
{
if (tmpRenderTexture != null)
{
tmpRenderTexture.Release();
}
if (createdMaterial != null)
{
DestroyImmediate(createdMaterial);
}
}
/// <summary>
/// このGameObjectを非表示にした時の処理
/// </summary>
private void OnDisable()
{
Release();
}
}
Passの呼び出し
tmpRenderTexture
に代入しています。//第1引数の画像を元に、Blitでシェーダー内のPass1を実行させ、結果を第2引数に書き込む
//Blitの仕様上、この書き込み処理は、第3引数のMaterial内の_MainTexを通して行われる
Graphics.Blit(sourceTexture, tmpRenderTexture, createdMaterial, 1);
このため描画順はPass1 > Pass0という、通常のシェーダーの流れとは違うトリッキーなものになります。
Init()
関数内でやっています。//事前にBlitで更新される予定のtmpRenderTextureを、_CustomTexの名前でシェーダー側と紐づけておく
//後はCanvasRender内の処理で自動的にPass0を実行させて、その_CustomTexを画像に反映させる
targetImage.material.SetTexture("_CustomTex", tmpRenderTexture);
Hierarychyの設定
インスペクターのIgnoraRangeの値を上げると、十字の切り抜きが拡大していきます。
なぜ_CustomTexが必要か?
コードを次のように修正してみます。
//_MainTexではなく、C#側から書き込みを行った_CustomTexを最終的な描画対象とする
//これによりuGUIの標準の描画ロジックを回避して、Pass1の内容を引き継いで出力できる
//まずこの_CustomTexから、指定のUV座標のピクセル色を抜き出す
//half4 original = SAMPLE_TEXTURE2D(_CustomTex, sampler_CustomTex, input.uv);
half4 original = SAMPLE_TEXTURE2D(_MainTex, sampler_MainTex, input.uv);
uGUI Image > Source Imageにアタッチされた画像の情報を_MainTexに代入し直してから、シェーダーの一番上のPassが実行されます。
Blitによって一時的にPass1の結果を指していたとしても、Pass0が走る瞬間には元の画像に戻ってしまい、処理内容が引き継がれません。